Beyond the Basics: How to Style a Show-Stopping Cheeseboard
Share
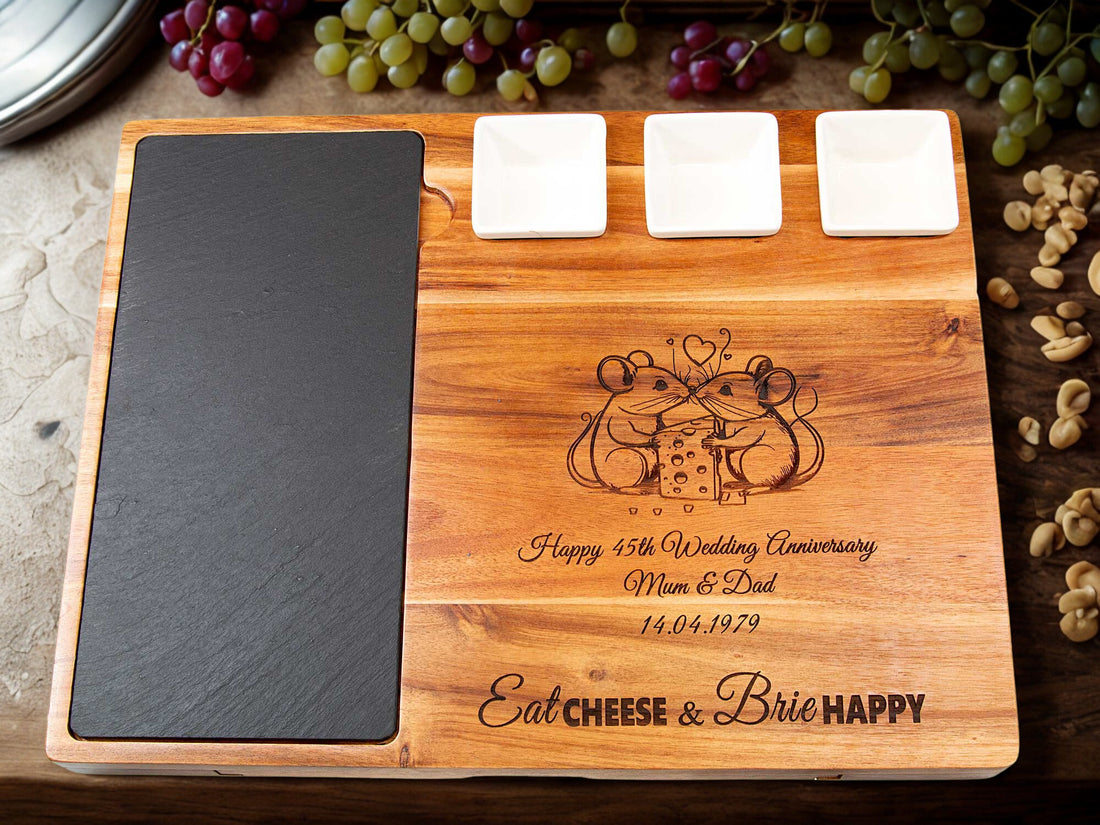
The Template: Your Premium Acacia Wood Cheeseboard
Our large personalised deluxe acacia wood cheese board with a wire cutter, a large slate, and three dishes is the ideal foundation for this project. Its unique features are designed to simplify the styling process and elevate your final presentation:
- The Rich Acacia Wood: The warm, beautiful grain of the wood provides an elegant, rustic backdrop that makes vibrant colours pop.
- The Large Slate Insert: This dark, cool surface offers a dramatic textural contrast to the wood and a new stage for your ingredients.
- The Three Ceramic Dishes: These are your secret weapons for organisation, preventing flavours from mingling and keeping your board looking clean and intentional.
Let's use this perfect template to master the art of cheeseboard styling.
Step 1: Place Your Anchors and Create a Framework
Start with the largest, most important elements: your cheeses. Don't just cluster them in the middle. Distribute your three chosen cheeses (one soft, one firm, one blue) around the board, leaving ample space between them. Think of them as the anchor points for your entire spread.
- Utilise the Slate: Place your firm cheeses directly onto the large slate insert. The dark surface creates a stunning visual contrast and makes the cheese stand out.
- Embrace the Dishes: Fill your three ceramic dishes first. Use one for a wet item like fig jam or honey, another for briny olives or cornichons, and the third for a handful of nuts or dried fruits. Placing these first helps you build around them and keeps your board organised.
- Showcase personalisation: If you had the board engraved with an attractive image, logo, quote or phrase let it take pride of place in the center of the board.
Step 2: Build the "Rivers" and "Piles"
Now, add your supporting cast of cured meats, crackers, and fruits. The key here is to move beyond simple rows and create a sense of organic abundance.
- The Charcuterie River: Instead of laying cured meats flat, fold them into delicate "rivers" or "S" curves that flow across the board, perhaps next to the slate insert. This adds elegance and makes the meat easier to pick up. Try folding salami slices into quarters or prosciutto into loose piles.
- Fan Out Your Crackers: Arrange crackers and bread in a fanned-out pattern around your cheeses and dishes. This looks much more inviting and abundant than a simple stack. Offer a variety of textures—a classic water biscuit, a rustic seeded cracker, and slices of a fresh baguette.
- Create Colourful Clusters: Don't scatter your fruit. Build small, generous piles of grapes, berries, or sliced apples. This concentrates the colour and gives the board a lush, overflowing look. Overlap the edges of your cheese or crackers slightly to create depth.
Step 3: Fill in the Gaps with "Jewellery"
This is where you transform your cheeseboard from an assortment of items into a work of art. Use small, beautiful elements to fill any empty spaces and make the board look bountiful and well-considered.
- Sprinkle the Jewels: Use your nuts, dried fruits, and small berries to fill in the gaps between your main clusters. Scatter them artfully around the board and into any open corners.
- Drizzle and Dollop: A drizzle of honey over a wedge of soft cheese or a dollop of quince paste near your firm cheese adds an interactive and delicious element.
- Add Fresh Greenery: Fresh herbs are your secret weapon for a professional finish. Tuck small sprigs of rosemary or thyme between the cheeses and crackers. The green colour provides a beautiful contrast and a lovely aroma.
The Final Polish: Utensils and The Personal Touch
No luxury cheeseboard is complete without the proper tools. Place cheese knives or wire cutter next to each cheese and a small spoon in your jam dish. Not only are these functional, but they also signal to your guests that this is a well-thought-out spread.
Finally, take a step back and admire your work. The rich acacia wood, the dramatic slate, and the tidy dishes all contribute to a board that is not only beautiful but a pleasure to serve from. The personalisation on your board adds that final, exclusive touch, making your creation truly one-of-a-kind.
Ready to build your masterpiece? Start with the perfect foundation. Explore the large personalised deluxe acacia wood cheese board and all other elegant platters here.
Founder of Cathcart Elliot Shoe Trees UK — passionate about quality shoes, shoe care and craftsmanship.
Read our full story →